New Manifest
A manifest is a group of orders which are pulled together to create a route and sequence for driver completion. Manifest can be made up of Pick-up, Delivery or Pick-up-Delivery order types.
Manifest can be created in 4 ways.
Create new manifests and manually assign individual or multiple orders from the orders menu.
Click "New Manifest"
Fill in "Manifest Name" and "Manifest Date" then click "Save"
Go to Orders: https://smartmove.solbox.it/app/orders.
Search orders by filtering orders that you want to see.

See How to search for orders for more information.
Select the orders you want to allocate to a manifest. Click "Allocate to a Manifest".
Scroll in drop down list to select the manifest you want to link.
Click "Link"

You will get a green notification at the bottom of the page showing that your orders have been allocated to the manifest.
Please go to the manifests menu and click into the manifest that you want to view the allocated orders.
Click into the manifest to view the allocated orders.
Final step! Click "Optimise" and your manifest is ready to go!
You can also look at the optimised orders on the map!
'Attach an Order' from within a manifest at the bottom of the page
After you created new manifest, click "Attach an Order".
You can type the customer reference number or customer name (input minimum 3 charactors). Pick the right order you want to attach to the manifest and click "Save Changes".
You can click "Reset Changes" if you want to reset the manifest to the original version.
Drag unassigned orders on the dashboard into a new manifest on the right control pannel.
If you want to manually allocate more orders, you can drag orders into an existing manifest.
Import manifest from a spreadsheet with manifest name attached to each order in the list
If you import file that each order has an attached manifest. The manifest will be created with orders inside which is ready to optimise. This is very quick way to create manifests then you can manage them later.
Click "Import XLS/CSV file".
The import XLS/CSV file funtionality here is working as same as the one in the orders menu and the dashboard.
Please see How to import Excel file for more information.
Update as of APRIL 2024:
Introducing a new feature in the system: route comparison. To use this, all
you need is to have version 4.6.0 of the driver app installed. The system will
then compare your planned route with the actual one you take, displaying it even if the manifest has not yet been
completed. This feature is designed to make your deliveries more efficient and
allow dispatchers to track your progress better. They can make any necessary
adjustments to the route in real-time, ensuring your deliveries are on track.
The latest system update includes a new feature that allows you to set a mandatory requirement for a valid driver's license. This feature ensures that only drivers with valid licenses are assigned to manifests. A driver needs to have a valid license to access the manifest.
To enable this feature, go to the settings and select the option "Valid driving licenses are mandatory for operating vehicles and processing orders." If you need to make an exception for any particular driver, you can add the driver's name to the list by clicking the "Add Driver" button. This will allow you to assign manifests to drivers who don't have a valid driver's license but have been granted an exemption.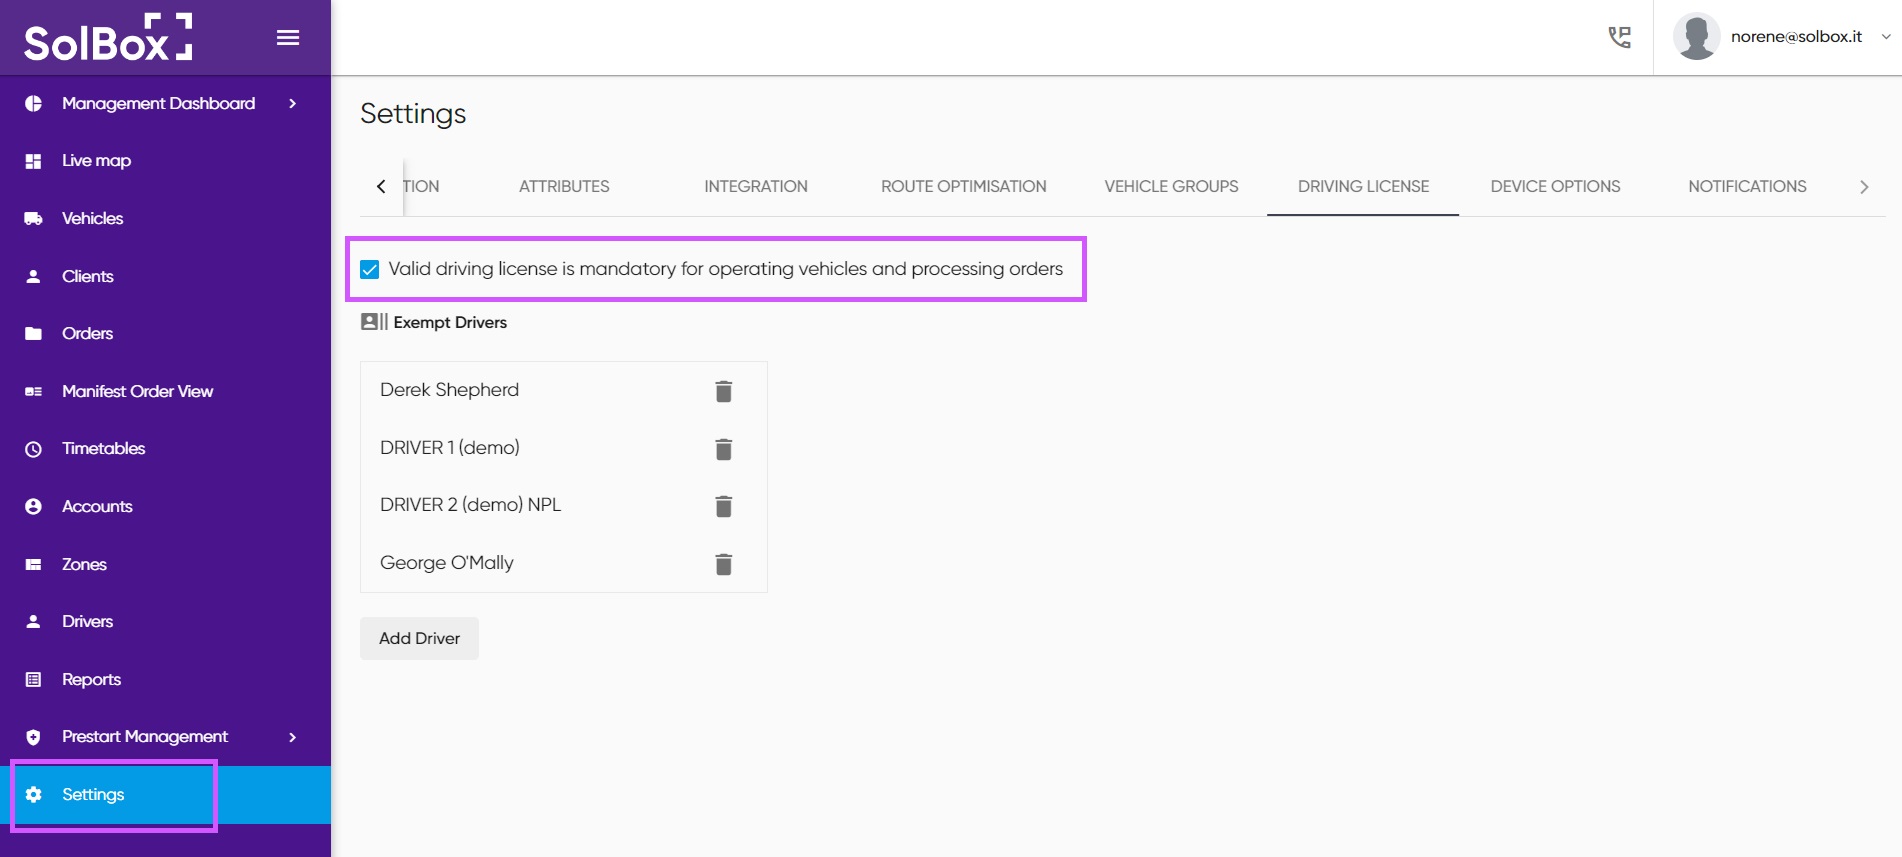
This new feature ensures that only drivers with valid licenses operate vehicles and process orders. It enhances the safety and compliance measures of the system and ensures that all drivers are authorized to operate vehicles before they are assigned manifests.
Related Articles
Editing Manifest Times
This article explains how to edit or adjust manifest times to accommodate changes in delivery times and customer time windows. Modifying The Manifest Time 1. Open the Manifest Go to the Manifests tab and select the manifest you want to edit. 2. Click ...New orders
Orders are the most important feature within the SolBox platform. Orders can be manually created as displayed below or imported, via a spreadsheet template or any third-party API/Software. Order types There are 3 types of orders that SolBox can ...New orders
Orders are the most important feature within the SolBox platform. Orders can be manually created as displayed below or imported, via a spreadsheet template or any third-party API/Software. Order types There are 3 types of orders that SolBox can ...New Drivers
Adding Drivers Driver profiles are essential for operating the SolBox platform. They are linked to Manifests and Vehicles to facilitate order completion (pickups and deliveries) via the driver app. Each driver must have a unique name, a login for the ...Change Order Sequence in the Manifest
How to Move Orders to a New Position in the Manifest Module The "Move to New Position" feature allows you to easily change the order sequence without the hassle of dragging and potentially losing your place, especially when managing large lists of ...